Image Properties
Enabling users to upload images and map faults and metrics to digital twin assets in the Onboarding Portal.

Product
Honeywell, Forge Onboarding Portal
Platform
Web app
TL;DR
Overview
Honeywell's Forge Onboarding Portal is configuration software that supports building "digital twins" of objects like sites and assets. A digital twin's details and real-time data run in Honeywell Forge's front-end applications so customers can monitor their physical objects.
Role
UX designer
Completed
October 2024
Problem statement
In the front-end applications, there currently isn't a way to visualize faults or metrics for assets in a site. When a technician or engineer is monitoring an asset (I.E., conveyor belt), they need to see where an active fault is and view synced data for specific parts of the asset.
Goals
Create user flows for managing images and properties for assets (I.E., conveyor belts)
Comply with Section 508 guidelines for designs and user interactions
Provide a scalable pattern so new property types can be introduced in the future
Implemented feature in demo environment
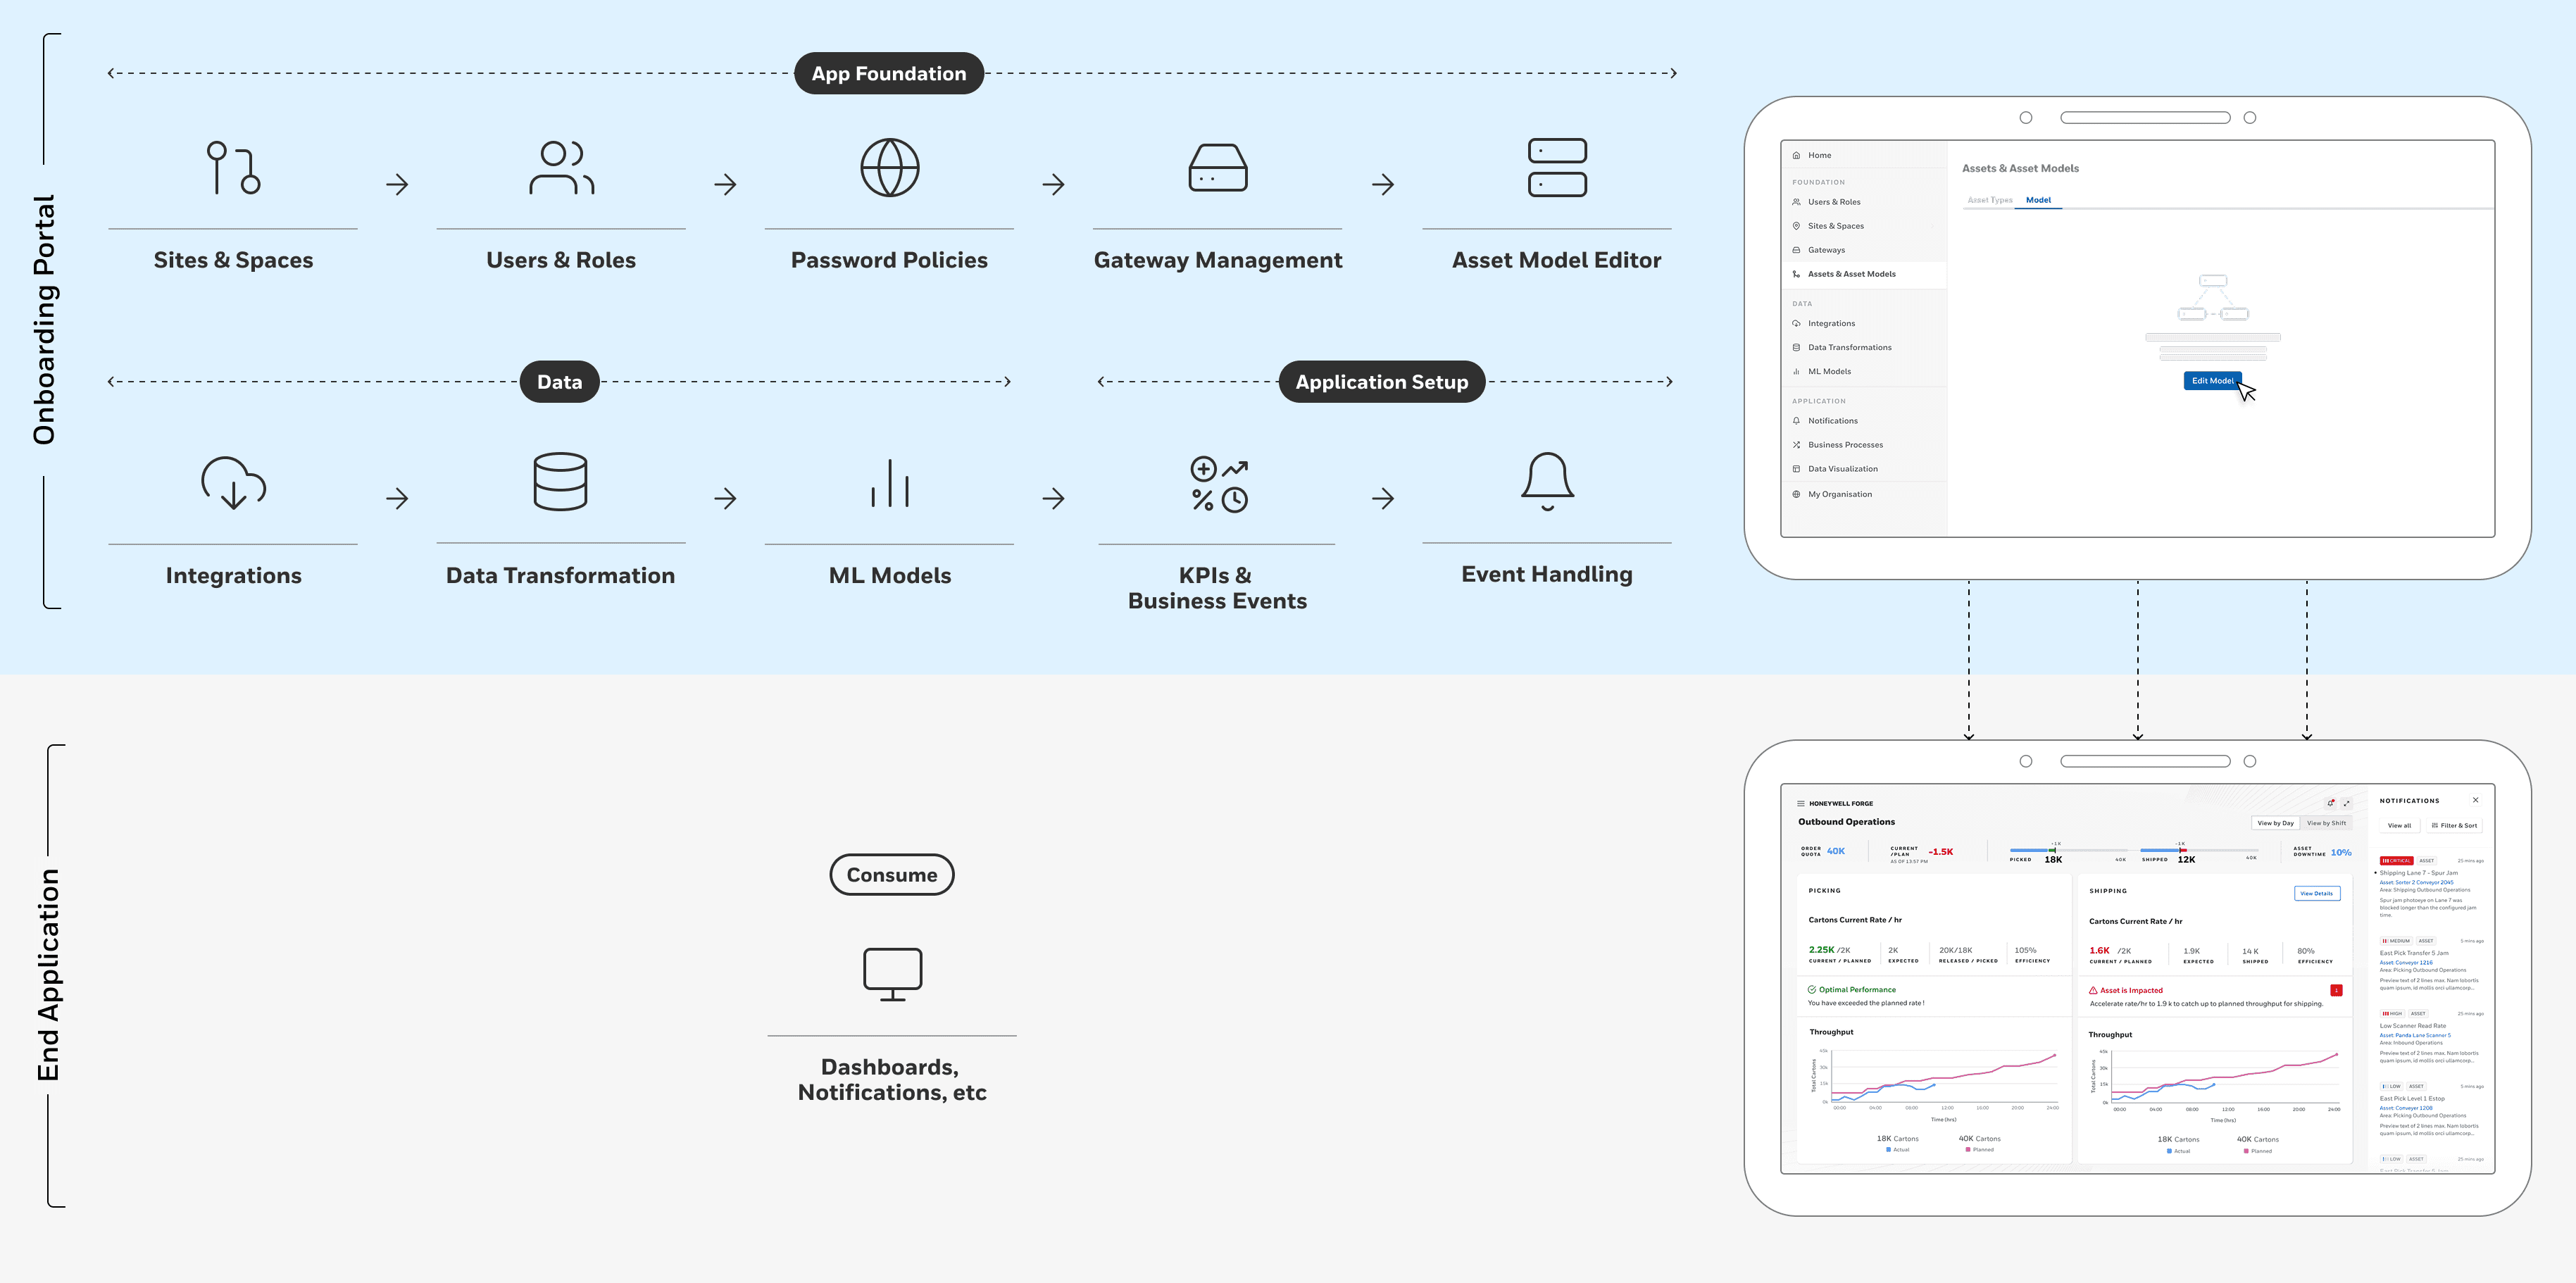
Background
Before a new customer can begin using Honeywell's end-applications, they must be setup in the Forge Onboarding Portal. Setting up a customer involves adding objects like assets and sensors, as well as event handling and KPIs.
What the customer sees in their application's dashboard is dependent on the setup process in the Onboarding Portal.
Research
The Onboarding Portal supports Honeywell's SBGs (strategic business groups) products such as Connected Buildings and Industrials. The features we deliver come from feedback from SBG stakeholders; we met with these stakeholders to identify user needs or pain points so customers can be onboarded efficiently.
Approach
Methodology: Stakeholder and user interviews
Participants: 3 total (2 SBG project managers, 1 system integrator)
Stimuli: Live review of the Onboarding Portal and the front-end application of Asset Performance Management (APM)

Research insights
End-users (I.E., technicians) need an advanced way to visualize and monitor objects, like assets, in Honeywell's front-end applications
Users of the Onboarding Portal (I.E., system implementors) need a way to upload custom images for objects when setting up the customer's assets and sites
System implementors need to map data, like faults and metrics, to the uploaded images

Feature definition
The image properties feature allows system implementors to upload custom images of objects to map faults and metrics directly to the image. The image and its mappings will run in the front-end applications so technicians and engineers can monitor assets and quickly find fault details.
User stories
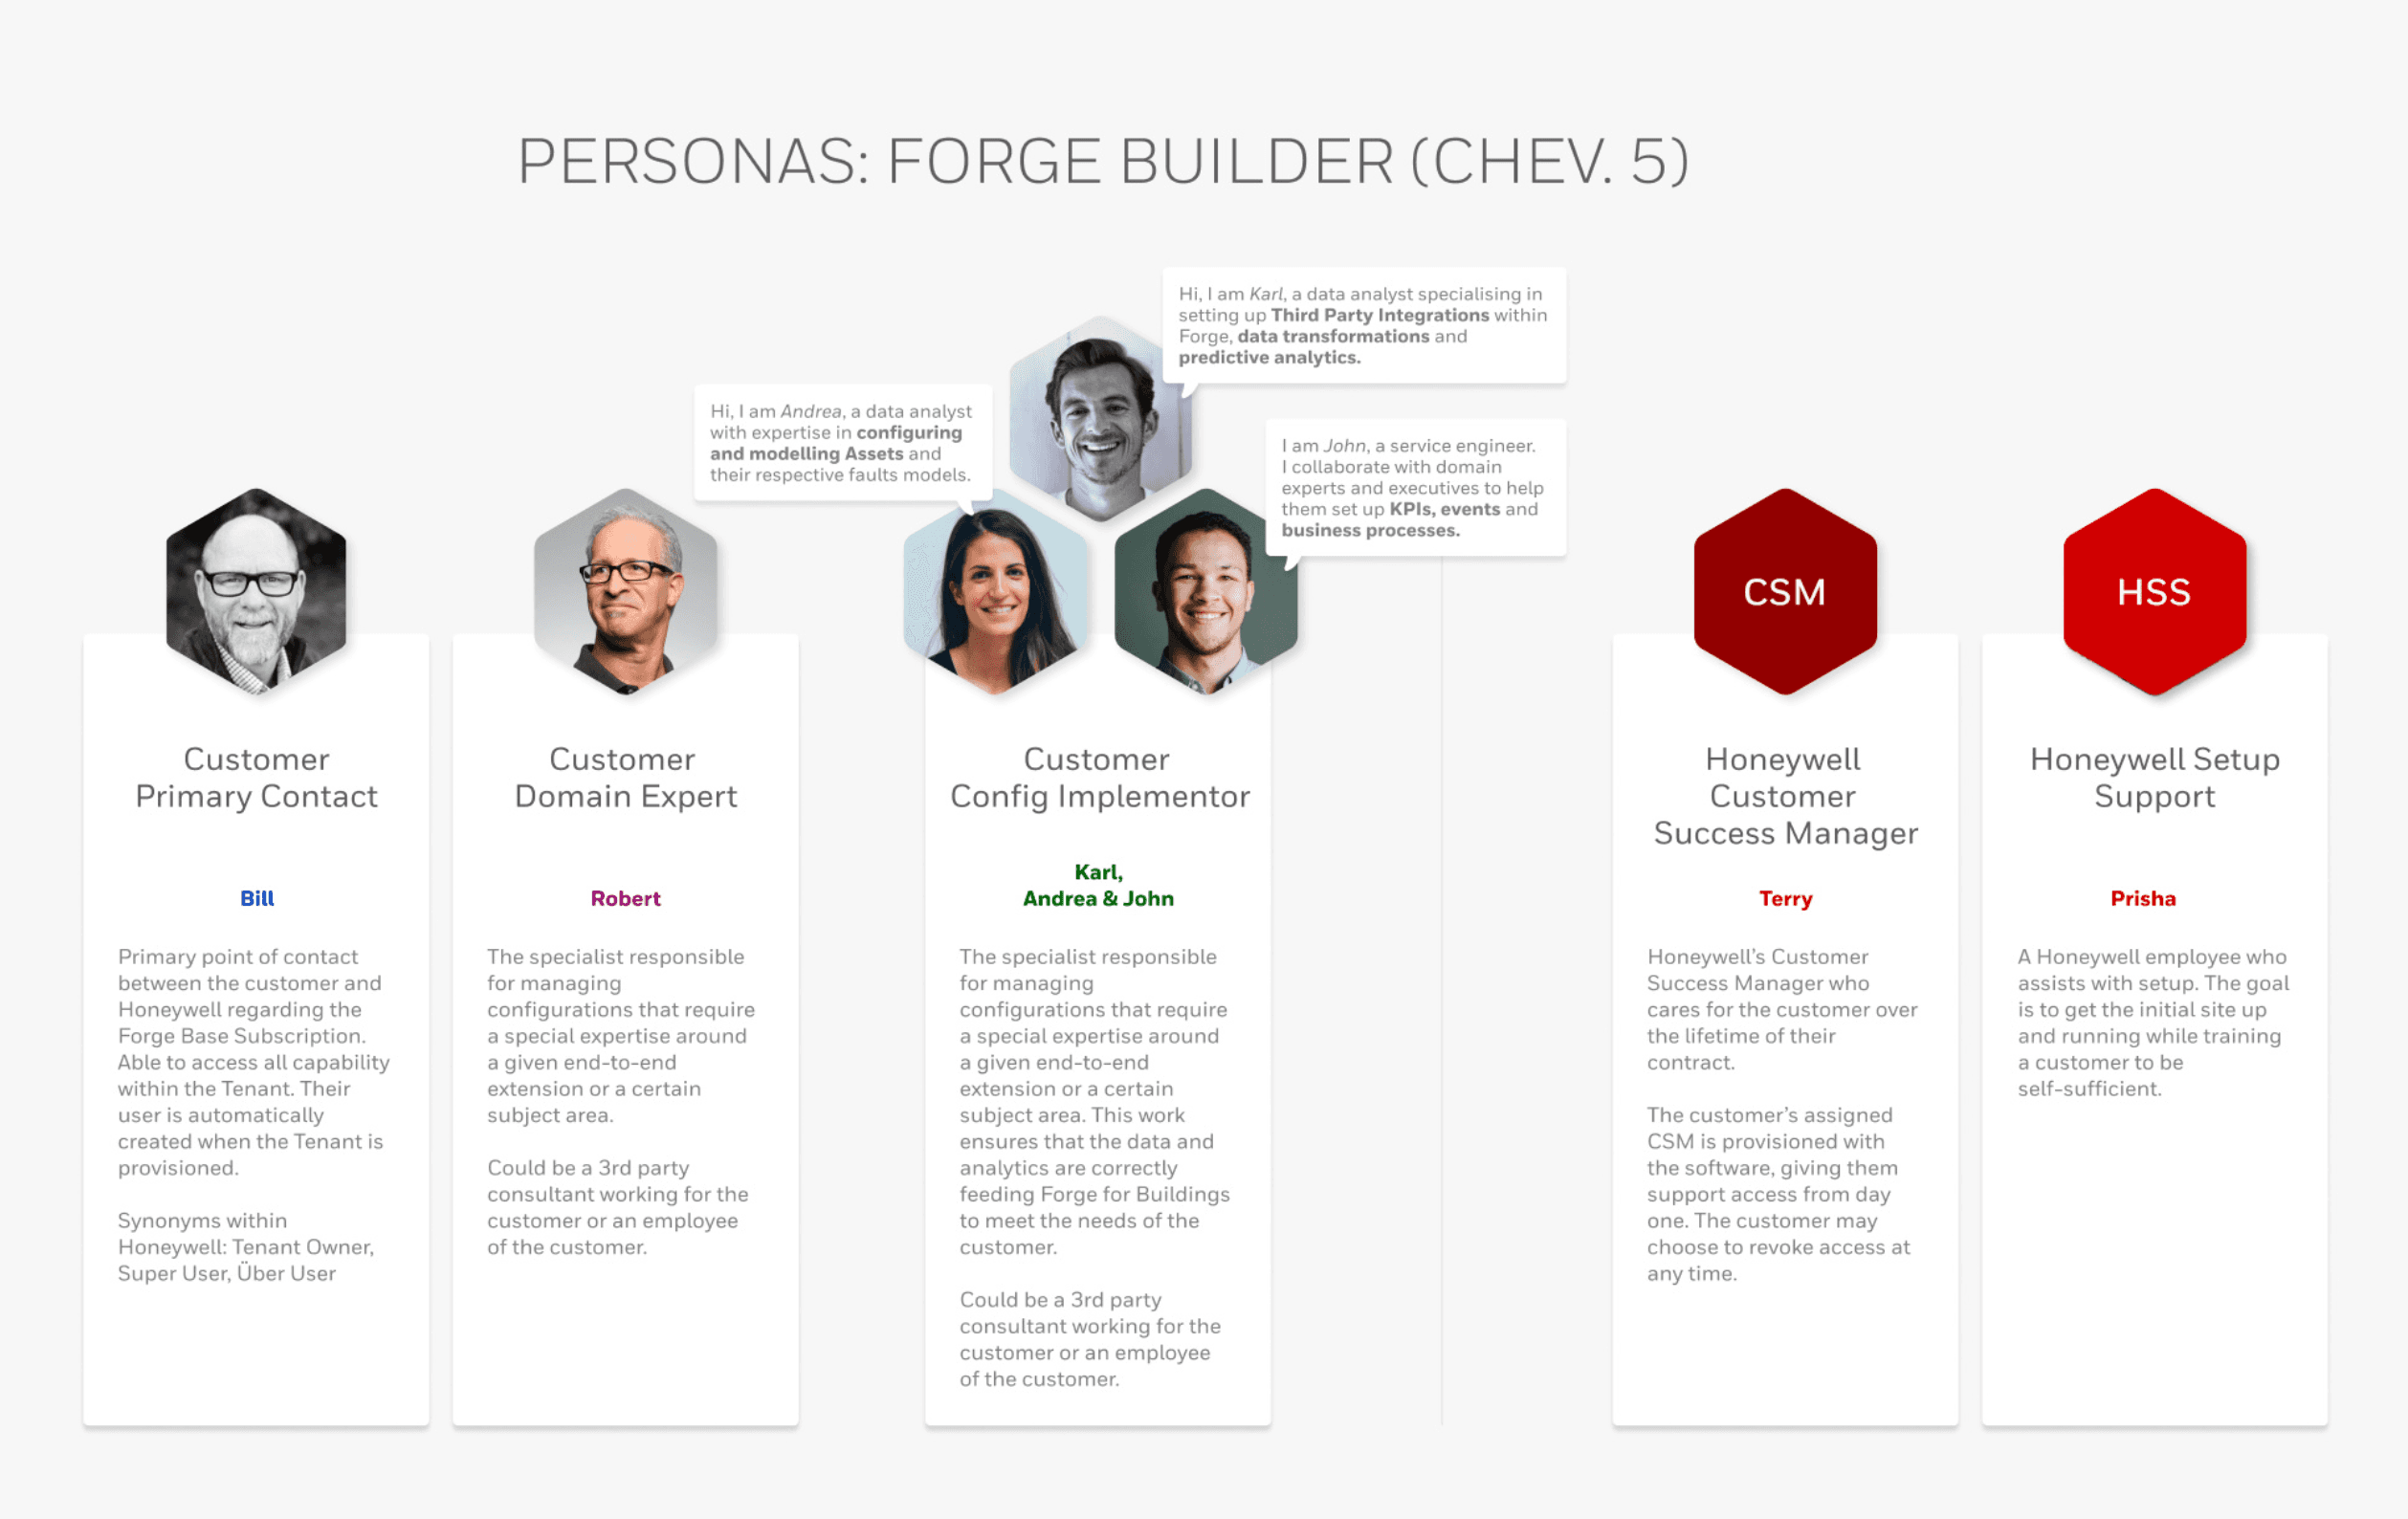
The Onboarding Portal is built for 2 user groups: Honeywell Setup Support and Customer Configurators. Both user's end-goal is to configure the customer's "digital twin" of objects efficiently and accurately.
Honeywell Setup Support and Customer Configurator:
"As Setup Support (or configurator), I need to efficiently configure the customer and create digital twins of their physical objects, like assets and sites, so their digital twins are accurate, and data can start flowing into the front-end apps."
User flows
Add a fault or metric property to a template image
Navigate to Asset Object Model —> View templates —> Select (1) template
Select "Edit" —> Select "Edit image properties" on the asset's image
Select "Add fault" or "Add metric" —> Fill out form details
Position the property on the image —> Select "Create"
Select "Back to template"

Manage properties in a template image
Select "Edit image properties" on the asset's image
Review existing properties —> Select "Edit" on an incorrect fault or metric
Make updates to the property —> Select "Save"
Select "Back to template"

Wireframes
Functional requirements
Upload custom image to the object (I.E., asset)
Add fault or metric property to the image of the object
Zoom and filter within the property canvas
Edit and delete image properties
Wireframe v1 - Modal
Select button from asset page to open the "Image properties" modal
Select "Faults" or "Metrics" on the left side of the modal
Position and scale the property (I.E., fault) directly on the image

Wireframe v2 - Full page
Select button on asset page to be taken to the full-page view
Select "Add" to then choose a fault or metric
Fill out the form for the fault or metric, select "Create"

Wireframe decision
To allow easy scalability and avoid usability issues of modals appearing on top of existing modals, I decided to move forward with the full-page version.

Final designs
The final designs were designed and implemented with the Forge UI Design System, and were added to the already existing form to create and edit an asset (I.E., conveyor belt) in the Forge Onboarding Portal.
Add custom or Honeywell image to asset
On the asset creation form, select "Browse image library"
Select (1) image from the image library modal, then select "Add"


Open "Image properties" page
On the asset creation form, select "Edit image properties"
Empty state for the image properties appears in a new page


Add a fault or metric to the image
Select "Add fault" or "Add metric" from Display Settings
Name the property and associate up to (10) faults or metrics
Select "Create" to add the fault or metric


Manage existing faults and metrics
Select the edit icon adjacent to the fault or metric
Make modifications then select "Save" (can also delete the fault or metric)


Prototypes for handoff
Flow: Add a fault property to the template's default image
Flow: View and manage live properties of a template's default image
Accessibility
Before handing the final designs off to my engineering team, I completed accessibility annotations in Figma to support correct keyboard functionality, labelling, and navigation.
Sample accessibility annotations
Landmarks, heading levels, and labels for UI components
Tab order with "Skip to main"


Keyboard QA of demo environment
As my engineer teammates began implementing this feature, I QA'ed the demo environment for accessibility issues. Because the design system, Forge UI, uses accessible colors for text and UI components, I focused my effort on keyboard navigation.
Navigate to image library modal
Issue flagged: When the image library modal appears, the keyboard focus isn't immediately sent to the modal—you must navigate through the whole form to reach the modal.
Create a fault property on image
Issue flagged: The user can use the mouse to scale the fault display, but is not doable with the keyboard; should be doable with Command (or Control)+Arrow keys.
Conclusion
Outcome
Throughout the design process, I collaborated with the design system lead, my project manager, and engineering teammates to ensure the designs were feasible and consistent within the whole product experience.
I handed off the Figma file with prototypes, annotations, and UI components for the engineering team to reference for implementation.
Lessons learned
Collaboration was a must for this feature. Because the image properties were complex, I was fortunate that my engineering teammates were willing to review early designs and give feedback. With regular review sessions, I was able to get questions answered and quick feedback from the team to deliver the designs on time.